
Which is better for wood, stain or varnish? People asking that question have already decided the two products are rivals competing for the same job, and that one of them has to lose. They don't compete. On nearly every cabinet, door, table, and deck, the two products run in sequence. One sets the color, and the other stands between that color and everything the world throws at it.
That reframe changes how you shop. You stop hunting for the winning product and start asking which order the products go on, whether they're compatible, and what the surface has to survive afterward. Get that right and a finish holds up for years. Get it wrong and you get blotchy color under a film that lifts at the edges within a season.
Each one does something different, where each earns its place, and the failure points that separate a finish that lasts from one that gets redone.
Table of Contents
- Stain and Varnish Side by Side
- Why Stain and Varnish Do Different Jobs
- Stain Types and How Much Grain Shows
- How Each Finish Holds Up Indoors
- Exterior Wood Where Stain Often Wins
- How to Use Stain and Varnish Together
- Choose Your Finish and Request an Estimate
- Frequently Asked Questions
Stain and Varnish Side by Side
Stain changes the color of wood. Varnish protects the surface. That's the answer in one line, and everything practical that follows comes down to which of those two jobs your wood needs more.
The table below puts both finishes on the criteria that usually decide the question for cabinets, doors, trim, and furniture.
| Question | Wood stain | Varnish |
|---|---|---|
| Main job | Changes wood color | Protects the surface with a clear film |
| Where it sits | Soaks into the upper layers of the wood | Forms a distinct coating on top of the wood |
| Grain visibility | Stays visible with semitransparent types; hidden with solid-color types | Stays visible because the film is clear |
| Surface feel | Little surface build; sheen depends on the product | Smooth film with a glossy to satin sheen |
| Wear and cleaning | Limited protection; relies on a topcoat for toughness | Good resistance to liquid staining; easier to wipe clean |
| Repairing wear | Often sanded or stripped, then re-stained | Chipped or peeling areas are hard to patch; usually sanded back and recoated |
| Typical role in cabinetry | Sets the color of the cabinet or door | Protects the color and the surface from daily use |
Read that as typical behavior, not a promise. A wiping stain on red oak and a gel stain on maple don't land in the same place, and a mid-grade varnish on a properly sanded and degreased panel will outlast a premium one applied over a contaminated surface. Preparation and product pairing move the outcome more than the label on the can.
Where the table surprises people is the last row. In cabinetry the two products usually share the work: stain sets the tone, then a clear topcoat seals it in. That's a sequence, not a contest.
A quick scan usually narrows the decision to two or three questions. How much grain do you want to see? How much wear does the surface take? Does it live indoors or outdoors? The rest of this works through each one.
Why Stain and Varnish Do Different Jobs
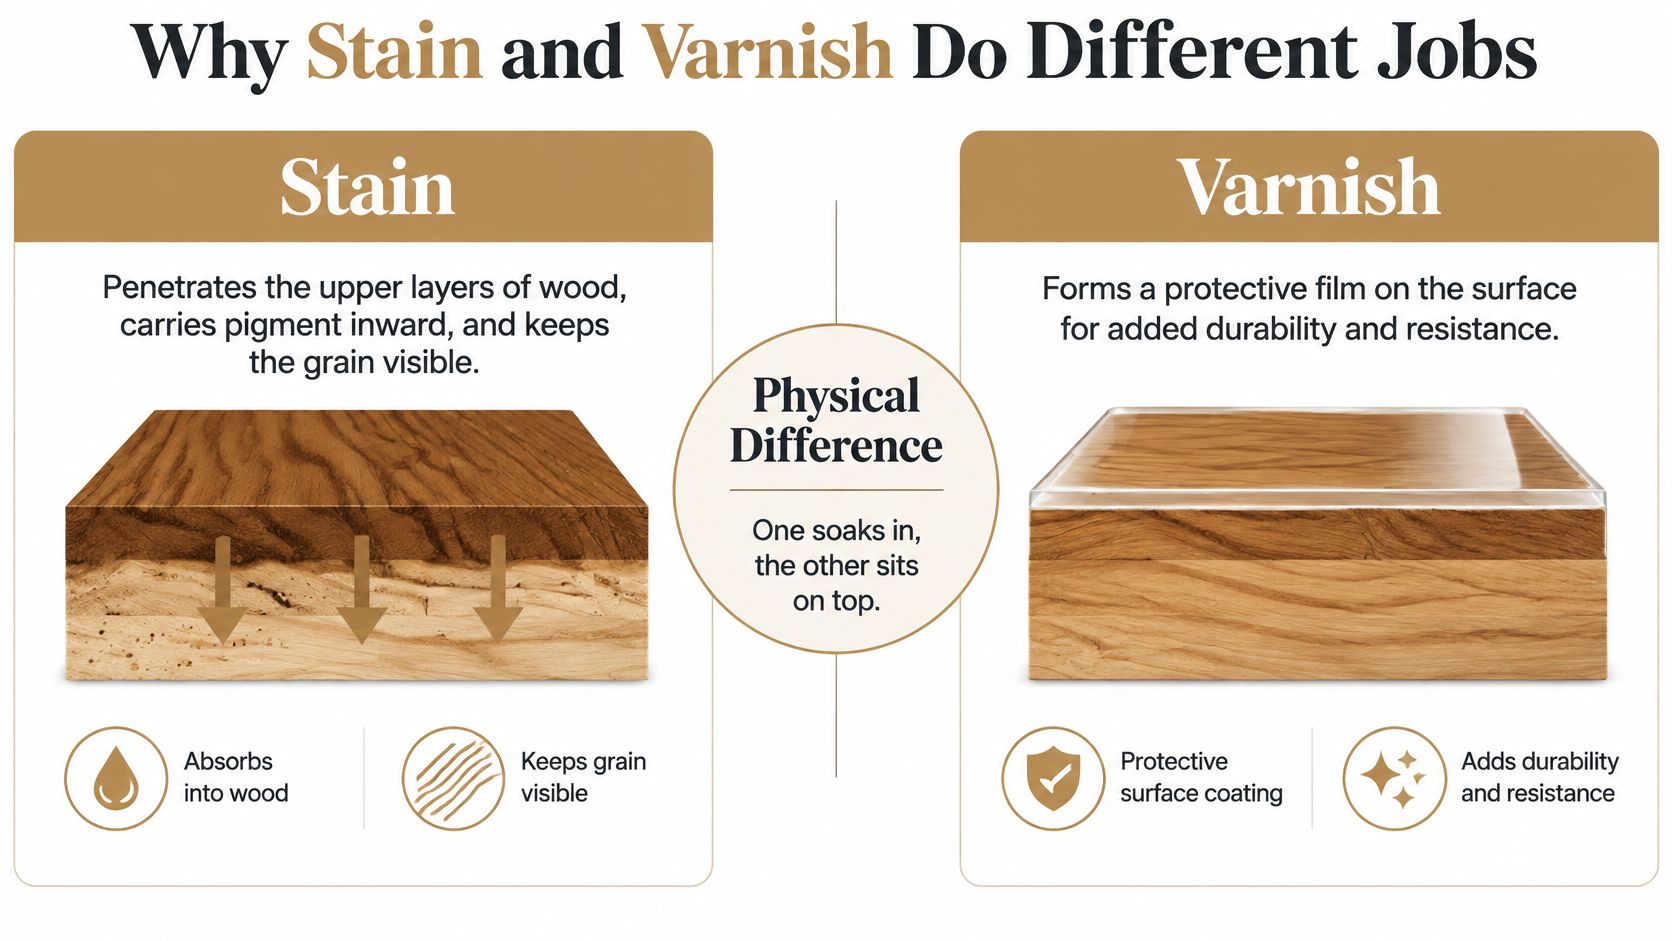
The difference is physical, not a matter of brand or budget. Stain is a penetrating product. It soaks into the upper layers of wood and carries pigment inward with it, so the wood stays porous and the grain keeps showing through. Varnish is a film-forming product. It cures by reacting with the air and builds a distinct coat above the wood.
That split shows up in technical and regulatory writing, not just trade habit. wood finishing guidance from the City of San Diego describes stain as a color treatment that generally leaves grain and surface texture visible, and varnish as a clear or semi-transparent coating that dries through a chemical reaction, with the two used together so one establishes appearance and the other protects against moisture, abrasion, dirt, and chemicals.
The diagram below shows where each product sits.
Three consequences matter more than anything else you'll read about these products.
Stain can often come back off. Because it only reaches the top layers, sanding or a chemical stripper can remove it, which is why changing a stain color is a realistic project rather than a rebuild.
Varnish has to come off as a film. You can't feather a cured patch of varnish into the surrounding finish and expect the repair to vanish. The film gets sanded back to bare wood or to a sound existing coat.
The order is stain first, then clear topcoat. The topcoat is what stands between the color and moisture, abrasion, dirt, and cleaning products.
Think of stain as dye soaked into a sponge and varnish as a pane of glass laid over it. The dye changes what you see. The glass changes what reaches the surface.
The short version: one soaks in, the other sits on top, and how each one fails follows directly from that.
For cabinets, doors, and furniture, the useful question isn't which product wins. It's which products pair cleanly on this particular wood, in this order, under this much use.
Stain Types and How Much Grain Shows
Not all stains look alike, and the difference isn't the color name printed on the lid. Pigment load decides how much grain survives, and that variable often matters more than the shade you pick. Purdue University Extension draws the line between semitransparent and solid-color stains on exactly that basis: semitransparent stains carry moderate pigment, penetrate the wood, and leave much of the grain visible, while solid-color stains hold substantially more pigment and cover the natural color and grain, with oil-based versions able to form a film that peels from the substrate.
That's the trade in one paragraph. More pigment buys coverage and gives up wood character.
Decide these three things before you open a can
How much grain should show? If the honest answer is "all of it," you want a semitransparent or dye-based stain. If it's "as little as possible," you're really shopping for a solid color, which behaves closer to a thin paint than to a stain.
Is the wood worth showing? Quarter-sawn oak, ash, and clear pine reward a lighter pigment load. Builder-grade doors with patchy veneer or visible filler usually look more even under heavier coverage.
Is the surface mismatched? A replaced door panel, a patched stile, or a cabinet run built from two different batches of oak will take the same stain two different ways. More coverage hides that. Less coverage advertises it.
Say a kitchen has dark, straight-grained oak doors and one replacement panel that came from a different mill. A semitransparent color change is a good candidate for the original doors, because the grain is the feature worth keeping. The odd panel may need a stronger pigment load, or a toner matched by hand, to sit convincingly beside them.
Absorption varies by species, cut, and whatever finish is already on the wood, so testing isn't optional caution. It's the step that prevents an expensive surprise. Sand a hidden spot, apply the stain, let it dry completely rather than judging it in twenty minutes, and compare it in daylight. Shop lighting flatters everything.
Cabinet restaining changes the tone of the wood while keeping the grain, and samples get finished in the customer's own wood species first, because the same stain on maple and on oak can land in two different places. If you're still narrowing shades, the guide to kitchen cabinet stain colors walks through how tones read on real cabinetry.
How Each Finish Holds Up Indoors
Indoors, the decision usually turns on handling rather than looks. Any surface that gets wet, scrubbed, or gripped every week is varnish territory. USDA Forest Products Laboratory guidance on film finishes notes that a film finish gives a smoother, more cleanable surface and better resistance to liquid staining than penetrating oils or sealers, which is why it suits cabinets, millwork, furniture, tables, and bar tops where abrasion and routine cleaning matter.
Here's where that film earns its keep.

Three indoor cases
The cabinet door beside the sink. Water spots, splashes, and a damp cloth every evening. A cured film handles this without dulling. A stained-only surface will show rings and a worn patch where hands land.
The bar top in a busy restaurant. Sanitiser, spirits, and glassware set down hard all night. A catalysed coating earns its cost here because the film resists both liquids and abrasion.
The low-traffic built-in. A bookcase or a hallway console that mostly collects dust needs less film build. A stain followed by a modest clear coat is often enough.
Then comes the trade-off, and it's real. Film finishes can eventually crack, chip, or peel, and once they do, localized patching is difficult. The damaged area usually gets sanded back and the whole surface recoated so the repair doesn't telegraph through the sheen. Stain on its own offers very little protection against spills and abrasion. It sets the color and waits for a topcoat to do the hard work.
Worth knowing: a finish can be refreshed without a full strip. Wood finish renewal lays a fresh stain and topcoat over the existing surface without sanding back to bare wood, which is why maintenance beats replacement on sound cabinetry.
Daily care is simple and mostly about what you avoid. Mild soap, a soft cloth, no abrasive cleansers or ammonia-heavy products that dull a film over time. Check the front edges of doors and the rim of a bar top for early lifting, because those are the places wear starts. For commercial kitchens, restaurants, and hotels where wood takes a beating, the practical guide to caring for commercial wood surfaces covers the routine that keeps a film intact.
Indoor wear depends on how a surface is used, not on a clock. Treat these cases as starting points.
Exterior Wood Where Stain Often Wins
Outdoors, the logic flips. A penetrating semitransparent stain doesn't form a continuous film, so water that gets into the wood can leave again, and trapped moisture is far less likely to blister or peel a coating that isn't there. Its pigment also absorbs ultraviolet radiation, which slows the graying that turns bare exterior wood silver.
USDA Forest Products Laboratory exterior finishing guidance gives realistic service ranges: about 2 to 3 years for a first application on smooth, planed wood, roughly 8 to 10 years for a properly maintained system once the wood has weathered, and as long as 10 years for two coats on rough-sawn or weathered wood, where the texture improves penetration and adhesion.
USDA service-life figures put both systems on record side by side, and the gap is the argument.
| Finish and condition | Typical service life |
|---|---|
| Penetrating stain, first coat on smooth planed wood | About 2–3 years |
| Penetrating stain, properly maintained system after weathering | About 8–10 years |
| Penetrating stain, two coats on rough-sawn or weathered wood | Up to about 10 years |
| Clear varnish, general exterior conditions | About 2–3 years |
| Clear varnish, full sun | About 1–2 years |
That's why penetrating stain is a sound specification for siding, fences, decks, and exposed millwork, where periodic cleaning and reapplication beat wholesale stripping. Sunlight degrades a clear film and the wood under it at the same time, and shaded or protected locations stretch the numbers on the varnish rows considerably.
Be clear about the limits too. Stain resists abrasion and surface staining less than a cured clear film, and color uniformity depends heavily on porosity, preparation, and how much product goes down. A blotchy exterior stain job is almost always an application problem, not a product problem.
On exterior wood, a finish that lets moisture escape will outlast one that seals it in.
A short checklist for an exterior project
Sun exposure. Full afternoon sun on a west-facing front door is a different job from a covered porch ceiling.
Wood texture. Rough-sawn and weathered boards drink stain and hold it. Smooth planed boards shed it sooner.
Moisture. Wet wood under a fresh coat traps water. Test with a few drops of water and let the surface dry for several dry days before any product goes on.
The existing coating. Penetrating or film-forming? A new system has to be compatible with what's already there, or the old finish has to come off first. Old film that's lifting has to be removed before anything bonds.
For Central Texas homes in Round Rock, Cedar Park, Georgetown, and Leander, the sun load is heavy and the summer heat is unforgiving, which makes product selection a site decision rather than a habit. Deck refinishing uses exterior stains and finishes selected to handle strong sun, heat, moisture, and changing weather, and our deck refinishing service starts with the condition of the boards, not with a color card.
How to Use Stain and Varnish Together
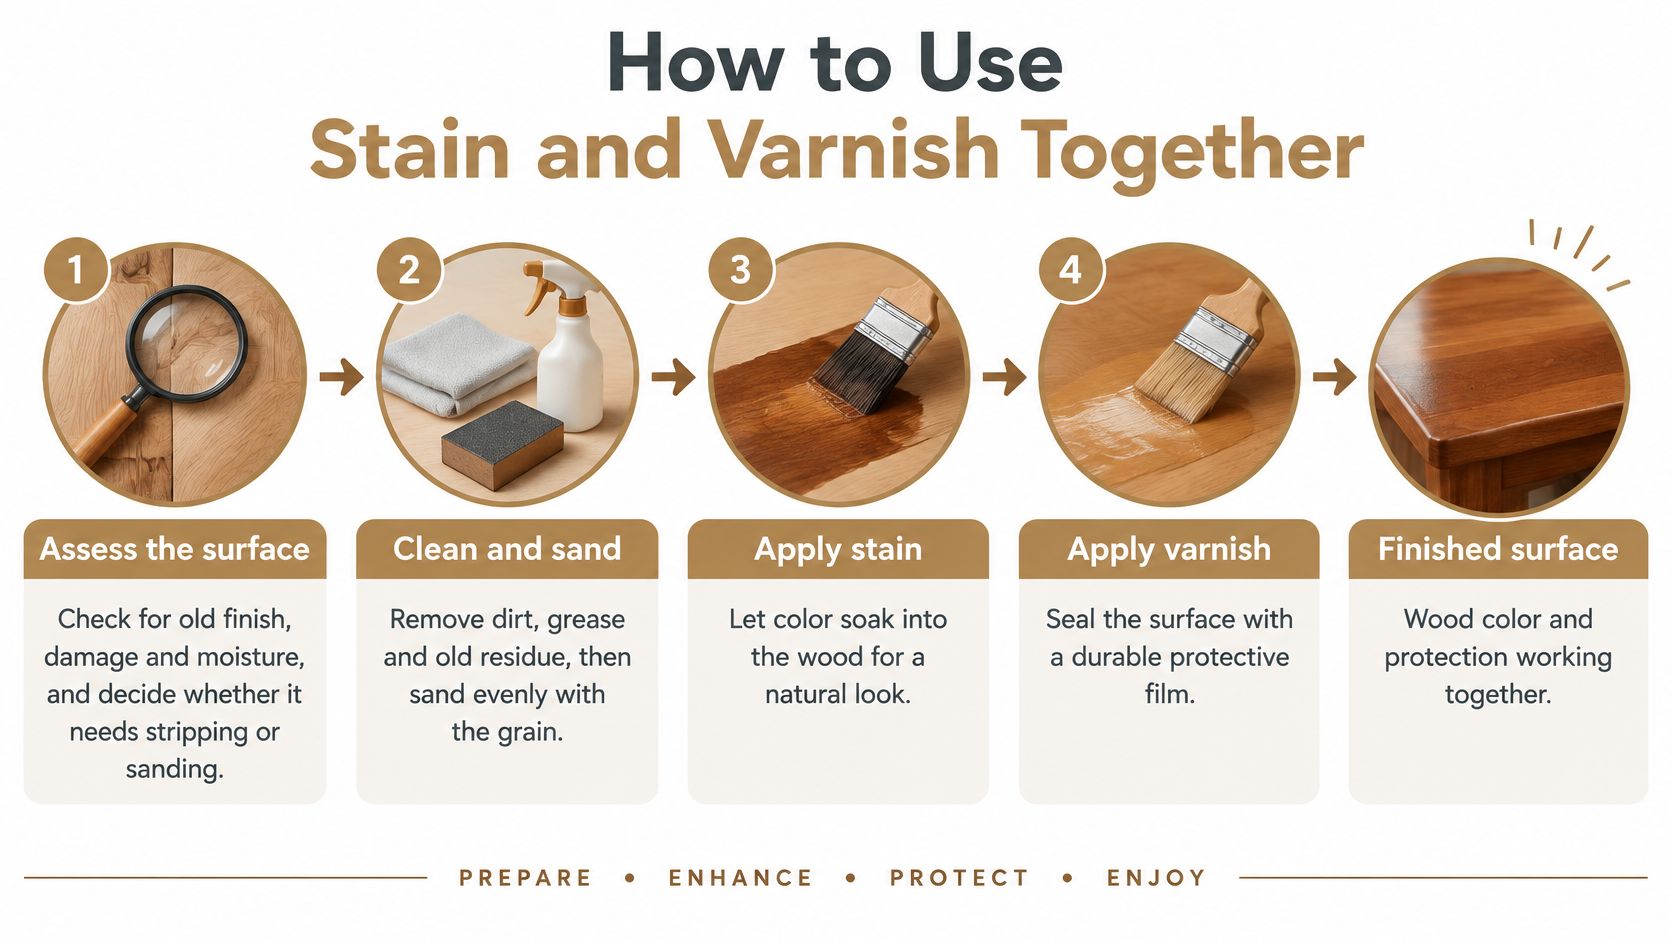
When both products are part of the job, the sequence and the drying matter more than the brand names. These are the steps that hold up.
Assess the surface. Look for old finish, damage, and moisture before anything else. If the existing coating is lifting or the wood is damp, more coating won't fix either problem.
Clean and sand. Remove dirt, grease, and old residue, then sand evenly with the grain through progressively finer grits, finishing around 120 to 150 on bare wood before staining. Sanding across the grain shows up later under a clear film, so keep the passes parallel.
Test the stain. Use a hidden spot or a sample board cut from the same wood. This is the step people skip and regret, because absorption varies by species even within one kitchen.
Apply the stain evenly and wipe the excess as the product directs, then let it dry fully. Rushing the dry time traps solvent and pushes uneven color under the topcoat.
Confirm the topcoat is compatible with the stain by reading both product guides. A waterborne clear over an oil-based stain that hasn't fully cured is a classic adhesion failure.
Apply the clear topcoat in thin, even coats, letting each one dry as directed. Thick coats cloud, drip, and stay soft far longer than the label suggests.
Sand lightly between coats when the product calls for it, around 220 grit, then wipe the dust off with a tack cloth. Dust sealed into a film is permanent.
Let the finish cure before heavy use. Cure time is much longer than dry-to-touch time, and a cabinet door that feels dry can still print a fingerprint a day later.
The infographic below shows the same flow in four stages.
Product chemistry has shifted over the years as well, and it's worth knowing what's in the can. An EPA case study of a wood furniture facility documented a move from solvent-borne coatings at 16 percent solids and 5.9 pounds of volatile organic compounds per gallon to ultraviolet-cured sealer and topcoat products at roughly 40 percent solids and fewer than 5 pounds of VOC per gallon. Higher solids and lower emissions, with the color and protection still doing their jobs.
Where these jobs go wrong
Topcoat over wet stain. The solvent can't escape, the film blushes or lifts, and the fix is a full strip.
Skipping the test. A stain that looked right on a sample board from a different species can dry two shades off on the actual door.
Sealing in dust. Wiping between coats takes seconds and saves a sanding job.
Mixing incompatible products. Penetrating and film-forming chemistries don't blend by accident, and neither do oil and waterborne systems without the right prep.
Coats that are too heavy. One thick coat is weaker than three thin ones, and it sags on vertical surfaces.
In our own process the final step is the same: the new stain and protective topcoat go on, and then the doors and hardware are reinstalled.
Choose Your Finish and Request an Estimate
Three questions settle most projects, and you can answer all of them without opening a catalog.
- How much of the grain should show? More visible grain points toward stain. Less visible grain opens up solid color and paint.
- How much wear will the surface take? Daily hands, spills, and scrubbing point toward a film.
- Indoors or outdoors? This one changes the answer more than anything else on the list.
The table matches common Central Texas projects to the finish usually suggested and the reason behind it.
| Project | Usually suggested | Main reason |
|---|---|---|
| Kitchen cabinets with attractive grain | Semitransparent stain, then a clear topcoat | Keeps the wood character visible and adds protection |
| Bar tops and dining tables | Stain plus a durable clear coat | A cleanable film handles spills and constant use |
| Interior wood doors and trim | Stain or clear film, depending on wear | Sets the color; a clear film adds protection in high-touch areas |
| Exterior decks and front doors | Penetrating exterior stain or finish | Handles sun, rain and moisture with less risk of peeling |
| Older cracked or peeling film | Strip or sand back, then refinish | Loose film must come off before new coats can bond |
Treat those as starting points, because species, condition, and sun exposure shift the answer from one house to the next.
For cabinetry, we prepare stain samples on your own cabinet doors so you can approve the color before the work continues. The quote for cabinet restaining is free, and it's the point where someone who finishes wood all week can look at the cabinets, the wood, and your goals before recommending a system.
A finishing system also isn't a one-time purchase. Deck refinishing uses finishing systems that can be maintained and refreshed over time without starting over, and the same logic applies to interior cabinetry that gets a refresh every several years.
Every project is different, so the next step is to get in touch for a personalized estimate. No pressure to decide anything on the first call.
One line worth keeping: choose a clear coat when cleanability and wear resistance matter most, and choose stain when keeping the grain visible and making future renewal easier are the priorities.
Frequently Asked Questions
Can I put varnish over stain?
Yes, when the two products are compatible. Let the stain dry fully rather than dry to touch, read both product guides, and test the combination on a sample board cut from the same wood before you commit to a whole cabinet run.
Is varnish enough on its own?
A clear varnish protects the surface but doesn't change the color. If the wood needs a new shade, stain it first and then add the clear topcoat, which is the sequence most cabinet work follows.
Does stain alone protect kitchen cabinets?
Not well against spills or daily handling. Stain sets the color and leaves the wood porous, so a topcoat is the better choice for a busy kitchen in Austin or anywhere else with real cooking going on.
Why does varnish peel on a deck?
Sun and moisture break the film down over time, and once it cracks or lifts, moisture gets behind it and the surface becomes hard to patch. For outdoor wood, a penetrating exterior stain is often the better fit.
How do I know which finish suits my Central Texas home?
Start with how much grain should show, how much wear the surface takes, and whether it sits indoors or outdoors. Every project is different, so a personalized estimate from RMK Contractors is the simplest way to get a straight answer.
RMK Contractors finishes cabinetry, millwork, decking, and entry doors across Austin, Round Rock, Cedar Park, Leander, Pflugerville, Georgetown, and Lakeway, and we're glad to talk through whether your project calls for a stain, a clear film, or both in sequence. Send a few photos of the cabinets, doors, or deck and ask for a personalized estimate; cabinet restaining quotes are free and come with a color sample on your own wood. Visit RMK Contractors when you're ready to get started, and there's no pressure to decide on the first conversation.